There are several answers to the question of how stretch ceilings are set. Most firms providing relevant services use one of the three main technologies:
wedge;
harpoon;
Seamless.
To deal with the features of each of them, it is necessary to at least briefly characterize each.
The most reliable, accessible in terms of cost and an effective answer to the question of how to mount stretch ceilings is the wedge system.
Thanks to it, you can maintain the height of the room as much as possible: the canvas is defended from the draft base by only 15-20 millimeters. By the way, with other systems, this is unattainable in principle. Since the wedge performance does not imply the use of harpoon, the canvas can be installed and dismantled an unlimited number of times. One of the main advantages is the ability to install on walls that have a complex configuration (winding, with a small radius, multifaceted).
Harpoon is the most popular. It is simple and the presence of an experienced installer does not require. Is the best solution for arranging ceilings of simple forms. For installation, you will need to make accurate measurements and, accordingly, the marking of the room. It is not forbidden to dismantle the canvases, but within the framework of this process there is a high probability that the harpoon will come off the canvas or it will receive damage itself.
Seamless technology is based on the use of a specially designed installation profile for it. It is suitable for only one type of canvases — having a fabric base. From the other two solutions, the seamless system is distinguished by the absence of the need to use decorative elements of the insert: fixation of the canvas is ensured by the elements of the profile tightly adjacent to each other. Of the shortcomings, the high cost can be noted, and also not a very wide range of textures.
Film or canvas?
Is there a difference of how stretch ceilings are installed with a film and fabric base? Yes, it is present.
The first difference has already been said: cloths on a fabric basis have no seams, forming a whole coating after installation.
The second is no less important — differences in installation. As you know, for installing film options you can not do without a heat gun. With its help, the canvas warms up, and only then is fixed in the profile. It is not difficult to treat her, but experience is necessary. Attempts to cope on their own can end deplorable (at least you will have to re -purchase materials). Therefore, it is better to hire a professional performer so that everything works out the first time.
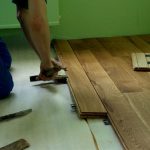
Independent installation: step -by -step guide
Before telling how the stretch ceiling is mounted, we list the tool that will certainly be needed in the process:
profile, skirting board, canvas;
building level;
knife or scissors;
putty knife;
screwdriver;
punch;
Self -tapping and dowels;
construction glue;
ladder.
In addition, the help of a partner will be useful.
And now — the stages of installation:
Preparation of the surface of the draft (main) ceiling. From it you need to remove the remains of the old finish, hide the wiring.
Filming profile. It is first glued over the entire perimeter of the room (or on a particular area), and then “sits” on screws. To get a strong design, they must be placed no closer than 70 mm and no further than 150 mm from each other. The evenness of the fasteners is checked by the level.
At this stage, the process of installing stretch ceilings begins directly. First, determine the middle of each wall. At this point, the canvas is refueling in the first place. Then you can move both in one direction and in the other. The main thing is that the step of the tax does not exceed 800 mm. The most convenient option is 200-300 mm.
When the canvas is completely seasoned, it is possible that defects in the form of bends will appear on its surface. Construction hairdryer will help get rid of them. To eliminate the bends, they make circular movements in the area of the problem area. Please note: the distance to the fabric base should not be less than 200 mm.