Everyone is used to thinking that laminate is a flooring. But the ideas of designers multiply at an incredible speed and now you can see the decoration of walls and even ceilings using a laminate.
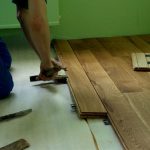
Before starting work, it is necessary to decide on what technology work will be done. You can fix the laminate to the wall with glue or on the crate. The latter option is more convenient, since laying with glue requires a pre -leveled wall, which will have to be spent more money and time. Bars made of wood are used for the crate, it is also possible to use metal profiles.
Wall decoration with laminate: installation instructions.
If it is decided to finish the walls with a laminate vertically, then you can start such a simple process in any corner of your room. Next, the first lamella is installed and it is attached using self -tapping screws to the crate. Lay the styling so that the groove of the castle connection is directed towards the wall located opposite. The crest of the lamellas will rest on the wedge, but it can be left without cutting it off, since the joint will be covered in the future with a skirting board. The panel must be exhibited in the vertical direction using a plumb line and level. The first panel is fixed to the opposite edge, to the groove, which will then be closed with a baseboard.
The installation of the second panel is inserted into the rowing groove. In order to install a tight connection of the shells, you need to use the tools and a boss. The latest detail may not fit so that this does not happen in the laminate need to be cut to obtain the desired size. In order to cut the panel, you can use a hacksaw for metal. So that the connection is more dense, you need to use the clamp. One end it needs to be inserted on the side of the panel, and the second is beaten. In the front side, such a lamel is attached to the edge of the wall. But this site will be in the future will be covered with skirting boards.